WhisperStream User Guide
Welcome to WhisperStream! This comprehensive guide will help you understand and use all the features of this powerful audio transcription and text-to-speech application.
Getting Started
WhisperStream is a Windows application that provides powerful audio transcription and text-to-speech capabilities. When you first launch the application, you'll see the main menu with options for different operations.
Note: The application requires Python, Whisper, and FFmpeg to be installed. If these are not detected, the Diagnostics screen will help you install them.
Main Menu
The main menu is your starting point for all operations in WhisperStream. It provides quick access to all major features:
Simply click on any button to open the corresponding form and begin your work.
Single File Speech-to-Text
This screen allows you to transcribe a single audio file into text using Whisper AI models.
Using Single File Speech-to-Text
- Select an Audio File: Click the "Browse" button to select an audio file. Supported formats include WAV, MP3, M4A, OGG, FLAC, and MP4.
- Choose a Model: Select a Whisper model from the dropdown:
- Tiny: Fastest processing, least accurate
- Base: Good balance of speed and accuracy (recommended for most users)
- Small: Better accuracy, moderate processing time
- Medium: High accuracy, slower processing
- Large: Best accuracy, slowest processing
- Transcribe: Click the "Transcribe" button to start the transcription process. The status bar will show progress updates.
- Review Results: Once complete, the transcribed text will appear in the output area.
- Save Transcript: Click "Save" to save your transcript in various formats:
- Plain Text (.txt)
- SubRip Subtitles (.srt)
- WebVTT Subtitles (.vtt)
- CSV Data (.csv)
- Timestamped Text (.txt)
Menu Options
File Menu
- Open Audio File: Browse and select an audio file
- Load Transcript: Load an existing transcript file
- Save Transcript: Save the current transcript
- Export Transcript: Export as plain text without timing data
- Exit: Close the form
Tools Menu
- Text-to-Speech: Access TTS features (Single or Batch)
- Batch Processing: Open the batch transcription form
- Media Player: Open the media player for synchronized playback
- Model Manager: Manage Whisper models
- Settings: Configure application settings
Tip: The application remembers your last selected model, so you don't need to select it every time if you're processing multiple files with the same settings.
Batch Speech-to-Text
The Batch Speech-to-Text form allows you to process multiple audio files simultaneously, making it ideal for transcribing large collections of audio files.
Using Batch Speech-to-Text
- Add Files: Click "Add Files" to select multiple audio files at once. All selected files will be added to the job queue.
- Configure Parallel Processing: Set the maximum number of parallel jobs (1-8). Higher values process faster but use more system resources.
- Start Processing: Click "Start Processing" to begin transcribing all queued files. The status bar shows overall progress.
- Monitor Progress: The job grid displays:
- File name
- Status (Queued, Processing, Completed, Failed, Cancelled)
- Progress percentage
- File size
- Status message
- Duration
- Error messages (if any)
- Transcript text preview
- Manage Jobs:
- Cancel Selected: Cancel selected jobs
- Retry Selected: Retry failed or cancelled jobs
- Remove Selected: Remove jobs from the queue
- Remove Completed: Clear completed jobs from the list
- Clear All: Remove all jobs (when not processing)
- Export Results: Click "Export Results" to save all completed transcripts to a folder. You can choose to remove filler words during export.
Job Grid Features
Right-Click Context Menu
Right-click on any job in the grid to access:
- Copy Transcript Text: Copy the transcript to clipboard
- Copy File Path: Copy the source file path
- Open Transcript in Notepad: View the transcript in Notepad
Keyboard Shortcuts
- Ctrl+C: Copy transcript text of selected job
- Delete: Remove selected jobs (when not processing)
Status Bar Information
The status bar at the bottom shows:
- Total jobs
- Queued jobs
- Processing jobs
- Completed jobs
- Failed jobs
- Overall progress percentage
- Estimated time remaining
Note: Jobs are color-coded in the grid: Blue (Processing), Green (Completed), Red (Failed), Gray (Cancelled), Yellow (Retrying).
Tip: You can stop processing at any time using the "Stop Processing" button. Queued jobs will remain in the queue and can be restarted later.
Single File Text-to-Speech
Convert text into natural-sounding speech using voice cloning technology. This feature uses Chatterbox-TTS for high-quality voice synthesis.
Using Single File Text-to-Speech
- Enter Text: Type or paste the text you want to convert to speech in the input area.
- Select Voice Prompt (Optional):
- Click "Browse" to select a voice sample file (WAV format)
- The voice sample will be used to clone the voice characteristics
- You can also enter a text description of the desired voice
- Choose Output Format: Select the audio format for the output file (WAV, MP3, etc.)
- Generate Audio: Click "Generate" to start the TTS process. A save dialog will appear to choose where to save the output file.
- Play Audio: Once generation is complete, click "Play Audio" to preview the generated speech. Click again to stop playback.
Additional Features
Test Installation
Click "Test Installation" to verify that Chatterbox-TTS is properly installed and configured. This helps diagnose any setup issues.
View Log
Click "View Log" to open the TTS operations log file, which contains detailed information about TTS operations and any errors that occurred.
Warning: If you receive an error that Chatterbox-TTS is not available, you can open the Model Manager from the error dialog to install it.
Tip: For best results, use a clear voice sample (3-10 seconds) with minimal background noise. The voice sample should contain natural speech in the language you want to generate.
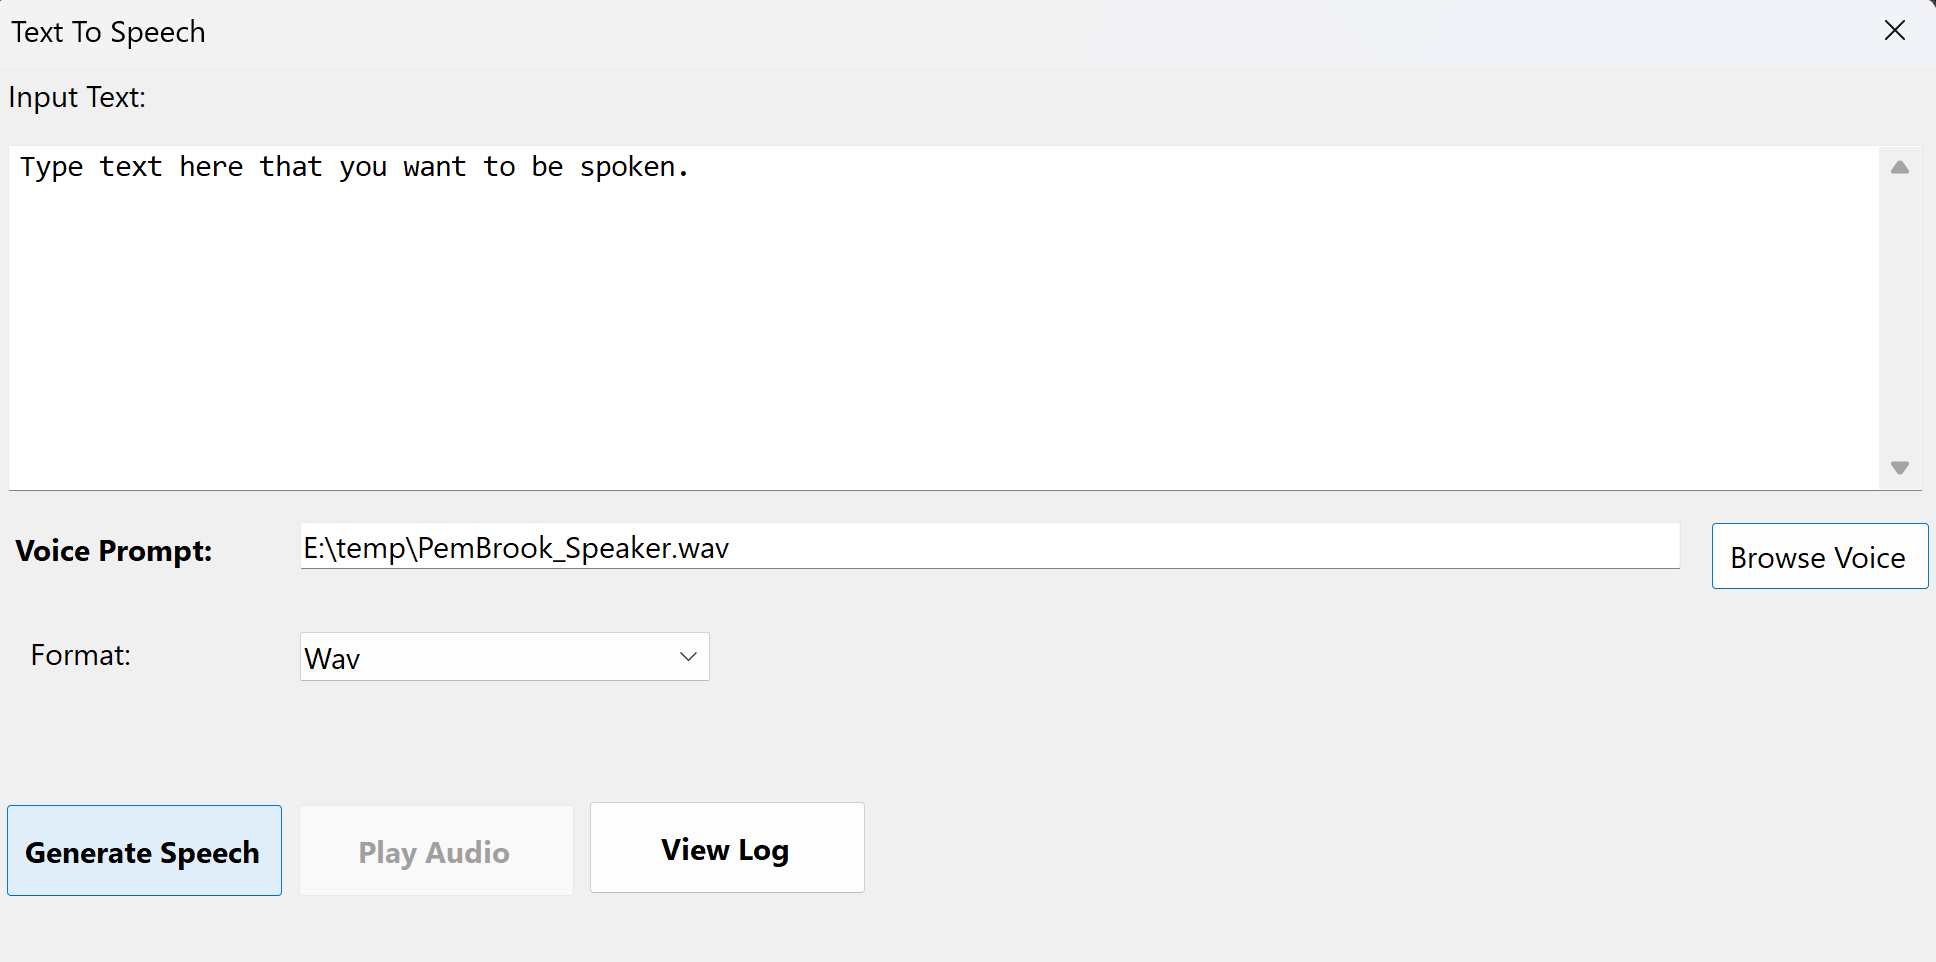
Single File Text-to-Speech interface
Batch Text-to-Speech
Process multiple text files or text entries simultaneously, converting them all to speech audio files. This is ideal for creating large collections of audio content.
Setting Up Batch TTS
- Select Output Directory: Click "Browse" next to the output directory field to choose where generated audio files will be saved.
- Choose Output Format: Select the audio format (WAV, MP3, etc.) for all generated files.
- Select Default Voice: Choose a default voice from the dropdown. This voice will be used for all jobs unless overridden.
- Open Voices Folder: Click "Open Voices Folder" to access the directory where voice samples are stored. You can organize voices in subfolders.
Adding Jobs
Add Text Files
Click "Add Files" to select multiple text files. Each file becomes one TTS job. The entire file content is used as the text to convert.
Add Manual Entry
Click "Add Manual" to enter text manually. You can enter multiple paragraphs separated by blank lines, and each paragraph becomes a separate job.
Add Pasted Text
Click "Add Pasted" to paste multiple text entries. You can use two formats:
- Simple format: One text entry per line
- With voice specification: Use
text|voice format to specify a different voice for each line
Example:
Hello world|subfolder/voice1
This is another line|voice2
This line uses the default voice
Job Management
The job grid displays:
- Text: Preview of the text content
- Voice: Voice file name being used
- Status: Current processing status
- Started: When processing began
- Completed: When processing finished
- Output File: Path to the generated audio file
Processing Jobs
- Start Processing: Click "Start" to begin processing all queued jobs. Jobs are processed sequentially.
- Monitor Progress: Watch the progress bar and status messages to track processing.
- Cancel Processing: Click "Cancel" to stop processing. Current job will finish, but queued jobs will remain.
Managing Results
Clear Completed Jobs
Click "Clear" to remove all completed and failed jobs from the list, keeping only queued and processing jobs.
Export Results
Click "Export" to create a ZIP file containing all completed audio files. This makes it easy to share or archive your generated content.
Open Output Folder
Click "Open Output Folder" to open Windows Explorer at the output directory, making it easy to access your generated files.
Delete Jobs
Select one or more jobs and press Delete or right-click and select "Delete Selected Jobs" to remove them from the queue.
Note: Jobs are automatically saved to disk and will persist between application sessions. You can close the form and return later to see your job history.
Tip: Voice files can be organized in subfolders within the voices directory. The dropdown will show the relative path (e.g., "subfolder/voice1") for easy organization.
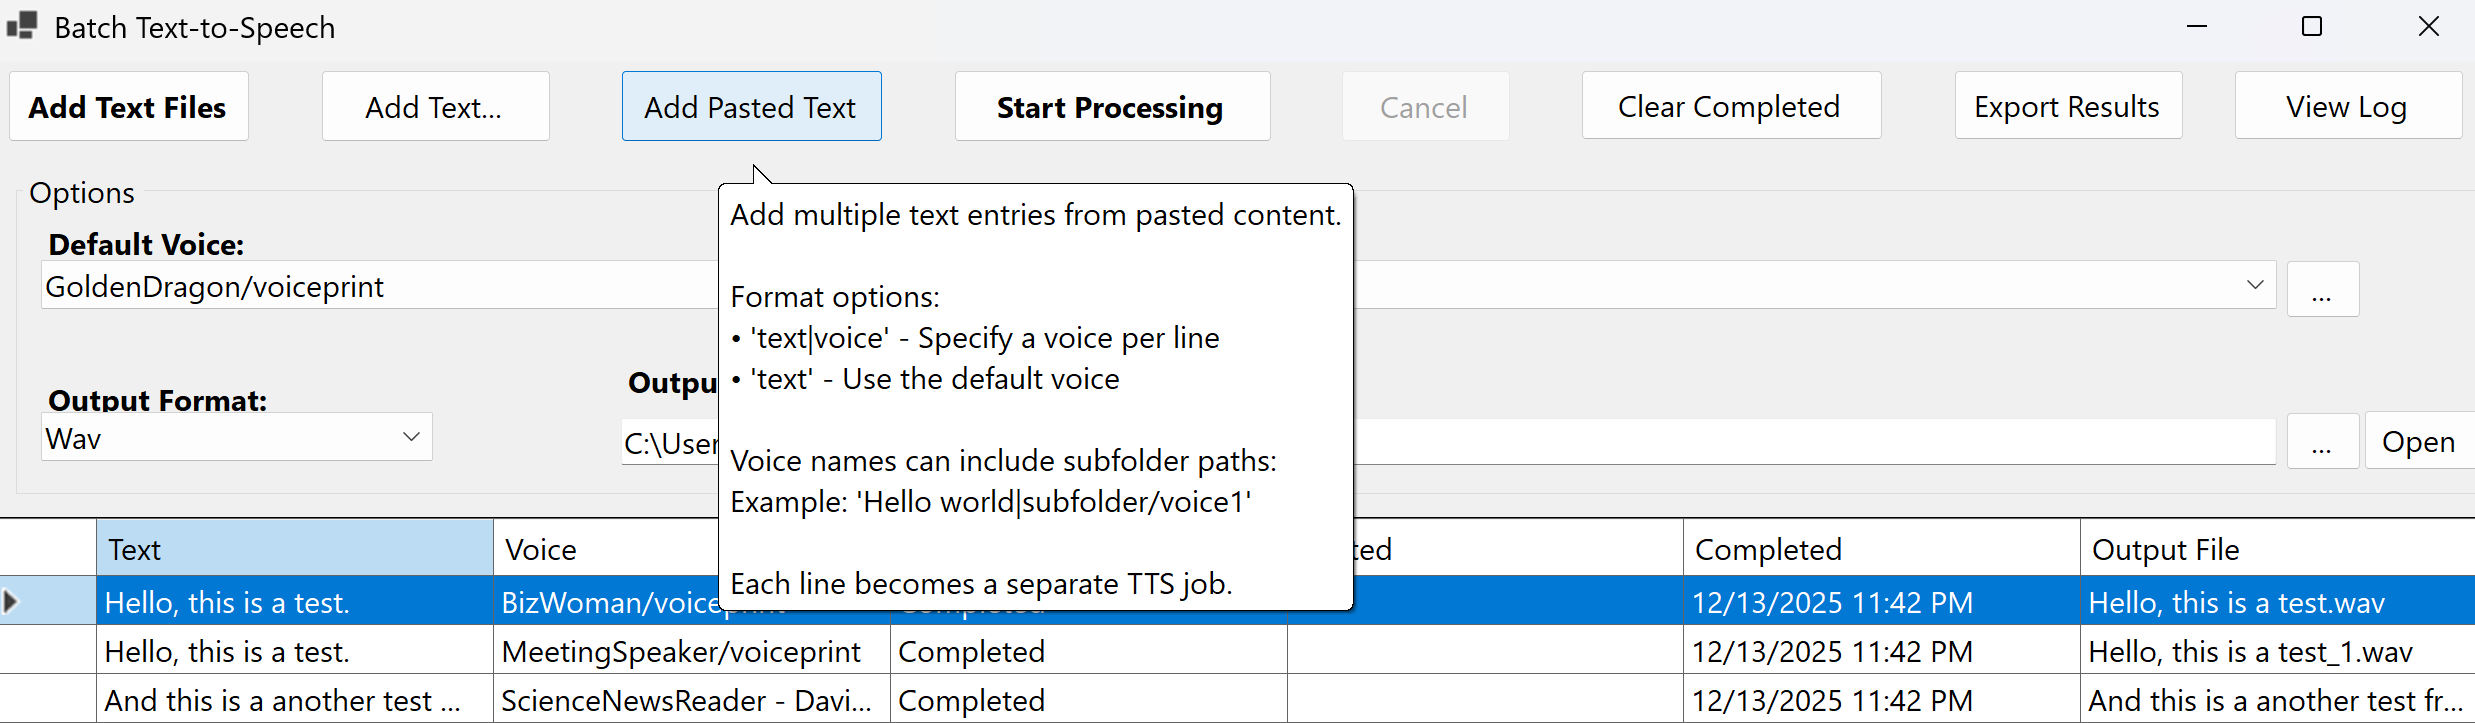
Batch Text-to-Speech interface
Settings
The Settings form allows you to configure all aspects of WhisperStream. Access it from the Tools menu in any form.
General Tab
| Setting |
Description |
| Output Folder |
Default folder where transcribed files will be saved |
| Default Model |
Whisper model to use by default (tiny, base, small, medium, large) |
| Language |
Default language for the user interface |
| Max Recent Files |
Maximum number of recently used files to remember (1-50) |
| Check for updates on startup |
Automatically check for application updates when starting |
| Start with Windows |
Launch WhisperStream automatically when Windows starts |
| Minimize to system tray |
Minimize to system tray instead of taskbar |
Transcription Tab
| Setting |
Description |
| Default Task |
Default transcription task (transcribe or translate) |
| Default Language |
Default language for transcription (auto-detect or specific language) |
| Enable speaker diarization |
Identify different speakers in the audio |
| Remove filler words |
Automatically remove filler words like "um", "uh", "like" from transcripts |
| Default Format |
Default output format for transcription files |
Audio Tab
| Setting |
Description |
| Default Volume |
Default volume level for audio playback (0-100%) |
| Remember volume between sessions |
Save and restore the last used volume level |
UI Tab
| Setting |
Description |
| Theme |
Visual theme (Auto, Light, Dark) |
| Font Family |
Font for displaying transcribed text |
| Font Size |
Font size for transcript text (8-72 points) |
| Show confidence colors |
Color-code text based on transcription confidence levels |
| Enable spell check |
Enable spell checking for transcribed text |
| Spell check language |
Language for spell checking |
Privacy Tab
Telemetry Settings
Configure anonymous usage data collection to help improve WhisperStream:
- Enable telemetry: Master switch for all telemetry features
- Send crash reports: Automatically send crash reports when errors occur
- Send usage statistics: Send anonymous usage statistics
- Send performance metrics: Send performance data to help optimize the application
- Send interval: How often to collect telemetry data (1-168 hours)
Anonymous ID: A unique identifier used for telemetry. You can reset it to generate a new ID.
View Privacy Policy: Click the button to view the complete privacy policy online.
Advanced Tab
Custom Paths & URLs
- Python Path: Custom path to Python executable (if not in system PATH)
- FFmpeg Path: Custom path to FFmpeg executable (if not in system PATH)
- Whisper Args: Additional command line arguments for Whisper
- Python URL: Custom URL for Python installer download
- FFmpeg URL: Custom URL for FFmpeg download
- Use system runtime only: Use system-installed Python/FFmpeg instead of bundled versions
Logging
- Enable debug logging: Create detailed log files for troubleshooting
- Log path: Directory where log files are stored
- Max log size: Maximum size of individual log files (1-100 MB)
- Log retention: Number of days to keep log files (1-365 days)
Performance
- Enable GPU: Enable GPU acceleration for transcription (if available)
- GPU device: Which GPU to use for acceleration
- Memory limit: Maximum memory usage for transcription (512-8192 MB)
- Temp cleanup: Automatically delete temporary files older than specified days (1-30)
Saving Settings
- OK: Save all settings and close the dialog
- Cancel: Discard changes and close without saving
- Apply: Apply settings without closing the dialog
- Reset: Reset all settings to their default values
Note: Some settings require restarting the application to take full effect. The application will prompt you if a restart is needed.
Diagnostics
The Diagnostics form helps identify and resolve setup issues with required components like Python, Whisper, and FFmpeg.
Understanding Diagnostics
When you first launch WhisperStream or if there are setup issues, the Diagnostics form will display:
- A list of any missing or improperly configured components
- Recommended installation steps
- Buttons to automatically install missing components
Available Actions
Install FFmpeg
If FFmpeg is not detected, click "Install FFmpeg" to download and install it automatically. A progress window will show the installation process with command-line output.
Cleanup
Click "Cleanup" to remove temporary files from failed downloads. This can help resolve installation issues and free up disk space.
Installation Progress
When installing components, a progress window displays:
- Real-time command-line output
- Progress percentage
- Status messages
- Error information (if any)
You can save the installation log for troubleshooting by clicking "Save Log" in the progress window.
Warning: Do not close the progress window during installation, as this may interrupt the process and leave your system in an inconsistent state.
Tip: If automatic installation fails, you can manually install the required components and configure their paths in the Advanced settings tab.
Tips & Tricks
Getting the Best Transcription Results
- Audio Quality: Use clear audio with minimal background noise for best results
- Model Selection: Start with "base" model for most use cases. Use "large" only when accuracy is critical and processing time is not a concern
- Language Settings: Specify the language if you know it, rather than using auto-detect, for better accuracy
- Speaker Diarization: Enable this feature when transcribing conversations with multiple speakers
Optimizing Performance
- Batch Processing: Adjust the parallel jobs setting based on your system's capabilities. More parallel jobs = faster processing but higher CPU/memory usage
- GPU Acceleration: If you have a compatible GPU, enable GPU acceleration in Advanced settings for significantly faster transcription
- Memory Limits: Adjust memory limits in Advanced settings if you encounter out-of-memory errors
Text-to-Speech Best Practices
- Voice Samples: Use 3-10 second voice samples with clear, natural speech
- Text Formatting: Use proper punctuation and capitalization for better speech synthesis
- Batch Processing: For large projects, use Batch TTS to process multiple files efficiently
- Voice Organization: Organize voice files in subfolders within the voices directory for easy management
Workflow Tips
- Save Frequently: Always save your transcripts after transcription to avoid losing work
- Use Media Player: Use the Media Player to review and edit transcripts while listening to the original audio
- Export Formats: Export in multiple formats (SRT for video editing, TXT for text processing, etc.)
- Batch Operations: Use batch processing for large collections of files to save time
Troubleshooting
Common Issues
- Transcription fails: Check that Python, Whisper, and FFmpeg are properly installed. Use Diagnostics to verify.
- TTS not working: Verify Chatterbox-TTS installation using the "Test Installation" button
- Slow processing: Try reducing parallel jobs, or enable GPU acceleration if available
- Out of memory: Reduce memory limits or process fewer files in parallel
- File access errors: Ensure audio files are not being used by another application
Getting Help
- Check the log files in the logs directory for detailed error information
- Use the Diagnostics form to identify setup issues
- Enable debug logging in Advanced settings for more detailed troubleshooting information
- View the TTS operations log for text-to-speech specific issues
Conclusion
This guide covers all the major features and screens in WhisperStream. The application is designed to be intuitive and user-friendly, with tooltips and help text available throughout the interface.
For the best experience:
- Take time to explore the Settings to customize WhisperStream to your needs
- Use batch processing for efficiency when working with multiple files
- Take advantage of the Media Player for reviewing and editing transcripts
- Keep your components (Python, Whisper, FFmpeg) up to date
Happy transcribing! We hope WhisperStream helps you efficiently convert between speech and text for all your projects.