Script Editor Guide
Learn how to create and manage LipsyncFlow video generation scripts
🎯 Overview
The Script Editor is the main interface for creating LipsyncFlow video generation scripts. It allows you to define characters, create script entries for AI-generated lipsync videos, and manage the entire workflow from script creation to service submission.
LipsyncFlow is a service that generates AI-powered lipsync videos where characters speak dialogue with realistic lip movements. The Script Editor helps you create the scripts that tell the service what characters to use, what they should say, and how the videos should be rendered.
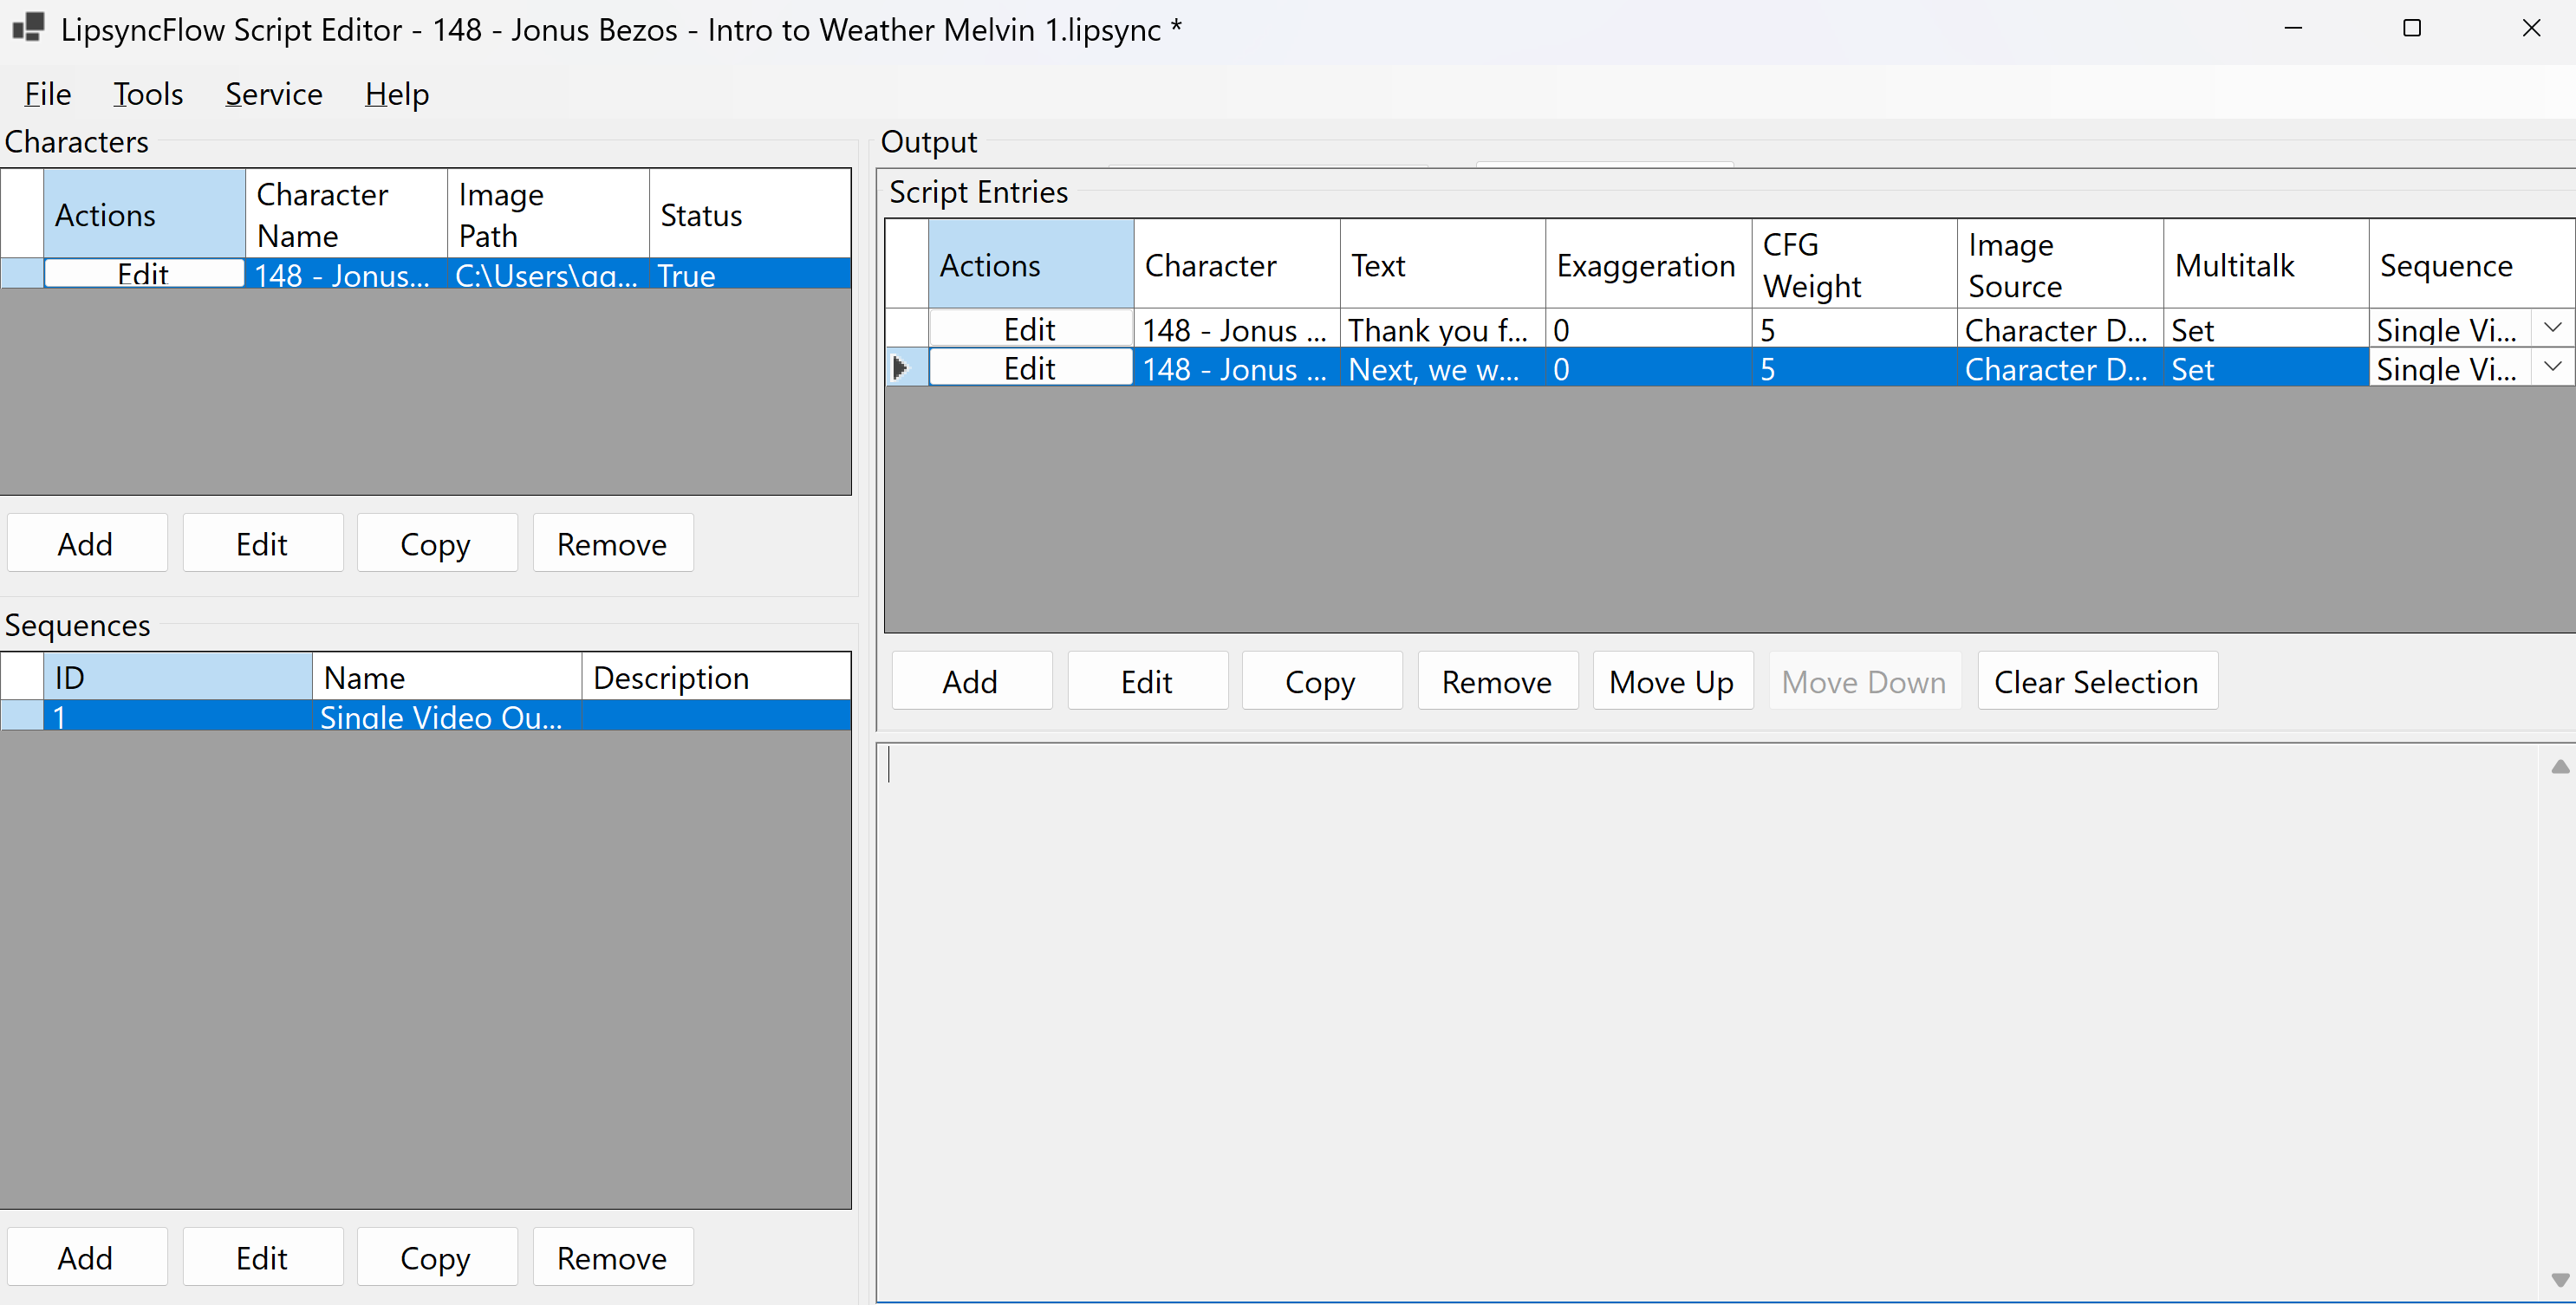
This is the primary interface for managing your AI video projects. It is divided into several key sections:
- Characters Panel (Top-Left): Define and manage your AI actors, including their names, default images, and voice print audio files. Use the Add, Edit, Copy, and Remove buttons to manage your character roster.
- Script Entries Panel (Top-Right): Create and edit individual dialogue lines or actions for your characters. Each entry represents a single video clip to be rendered. The grid shows character, text, TTS parameters, image source, and sequence assignment.
- Sequences Panel (Bottom-Left): Organize multiple script entries into logical sequences. FFmpeg filters can be applied to entire sequences or individual clips within them. Use Add, Edit, Copy, and Remove to manage sequences.
- Output/Status Panel (Bottom-Right): Displays application logs, status messages, validation results, and JSON output. The status bar shows current operation status and validation information.
- Menu Bar (Top): Provides access to file operations (import/export scripts), edit operations (copy/paste JSON, AI prompt builder), tools (Media Processor Library, validation), service configuration, and help documentation.
- Action Buttons: Quick access to common operations like generating JSON, sending to service, and clearing selections.
🏗️ Core Components
The Script Editor consists of several key areas that work together to create complete video generation scripts:
👥 Character Management
Define characters with default images and voice print audio files. Characters serve as the foundation for all script entries.
📝 Script Entries
Create individual video clips with dialogue, TTS parameters, and image controls. Each entry represents one video segment.
🎞️ Sequences
Group related script entries together and apply FFmpeg filters to individual videos or the combined sequence.
⚙️ Media Processors
Manage reusable FFmpeg filter chains for video and audio processing across your projects.
🔧 Service Integration
Configure and communicate with the LipsyncFlow service for video generation and job submission.
💾 File Management
Save, load, export, and import scripts in various formats including native .lipsync and JSON.
🤖 AI-Assisted Editing
Generate comprehensive AI prompts to edit scripts using external AI chat interfaces, then import the results back.
🚀 Getting Started Workflow
Follow this step-by-step process to create your first LipsyncFlow script:
Step 1: Add Characters
Click "Add Character" to define your video actors. Each character needs a name, default image file, and voice print audio file for voice cloning.
Step 2: Create Script Entries
Add dialogue entries by clicking "Add Script Entry". Each entry specifies which character speaks, what they say (must be less than 30 seconds when spoken), and how the video should be rendered. Use the text splitting feature for longer dialogue.
Step 3: Configure TTS Parameters
Adjust exaggeration (0.0-1.0) for emotional intensity and CFG Weight (0.5-5.0) for speech pacing control in each script entry.
Step 4: Set Image Sources
Choose how each video starts: use character default, previous video frame, or a custom override image.
Step 5: Apply Video Effects (Optional)
Add FFmpeg filters for video enhancement, color correction, or special effects using the Media Processor Library.
Step 6: AI-Assisted Editing (Optional)
Use "Edit → Copy AI Edit Prompt..." to generate a comprehensive prompt for AI-assisted script editing, then use "Edit → Paste JSON" to import AI-generated improvements.
Step 7: Validate and Submit
Use "Tools → Validate Script" to check for errors, then "Send to Service" to submit your script for video generation.
👥 Character Management
Characters are the foundation of your script. Each character represents an AI actor that can speak dialogue in your videos.
Creating Characters
- Keep it concise — the model has a token limit and pads/truncates to its text_len, so overly long prompts will be truncated.
- Use comma-separated short concepts (e.g., "blurry, low quality, distorted") and avoid redundant synonyms.
- Avoid contradictions — do not include conflicting instructions unless explicitly intended.
For optimal voice cloning results, your voice print audio should be:
- Less than 10 seconds long - Keep the recording concise
- Include 1 second of silence at the end - This helps the AI model understand speech boundaries
- Clean, clear speech - No background noise, music, or other voices
- Consistent tone and pace - Speak naturally as you would in your videos
Character Properties
- Name: Unique identifier for the character
- Default Image: Starting image used when no override is specified
- Voice Print Audio: Reference audio for voice cloning and TTS generation (should be less than 10 seconds with 1 second of silence at the end)
- Validation Status: Real-time check for file existence and validity
📝 Script Entry Creation
Script entries define individual video clips with dialogue, TTS parameters, and rendering options.
Basic Script Entry Setup
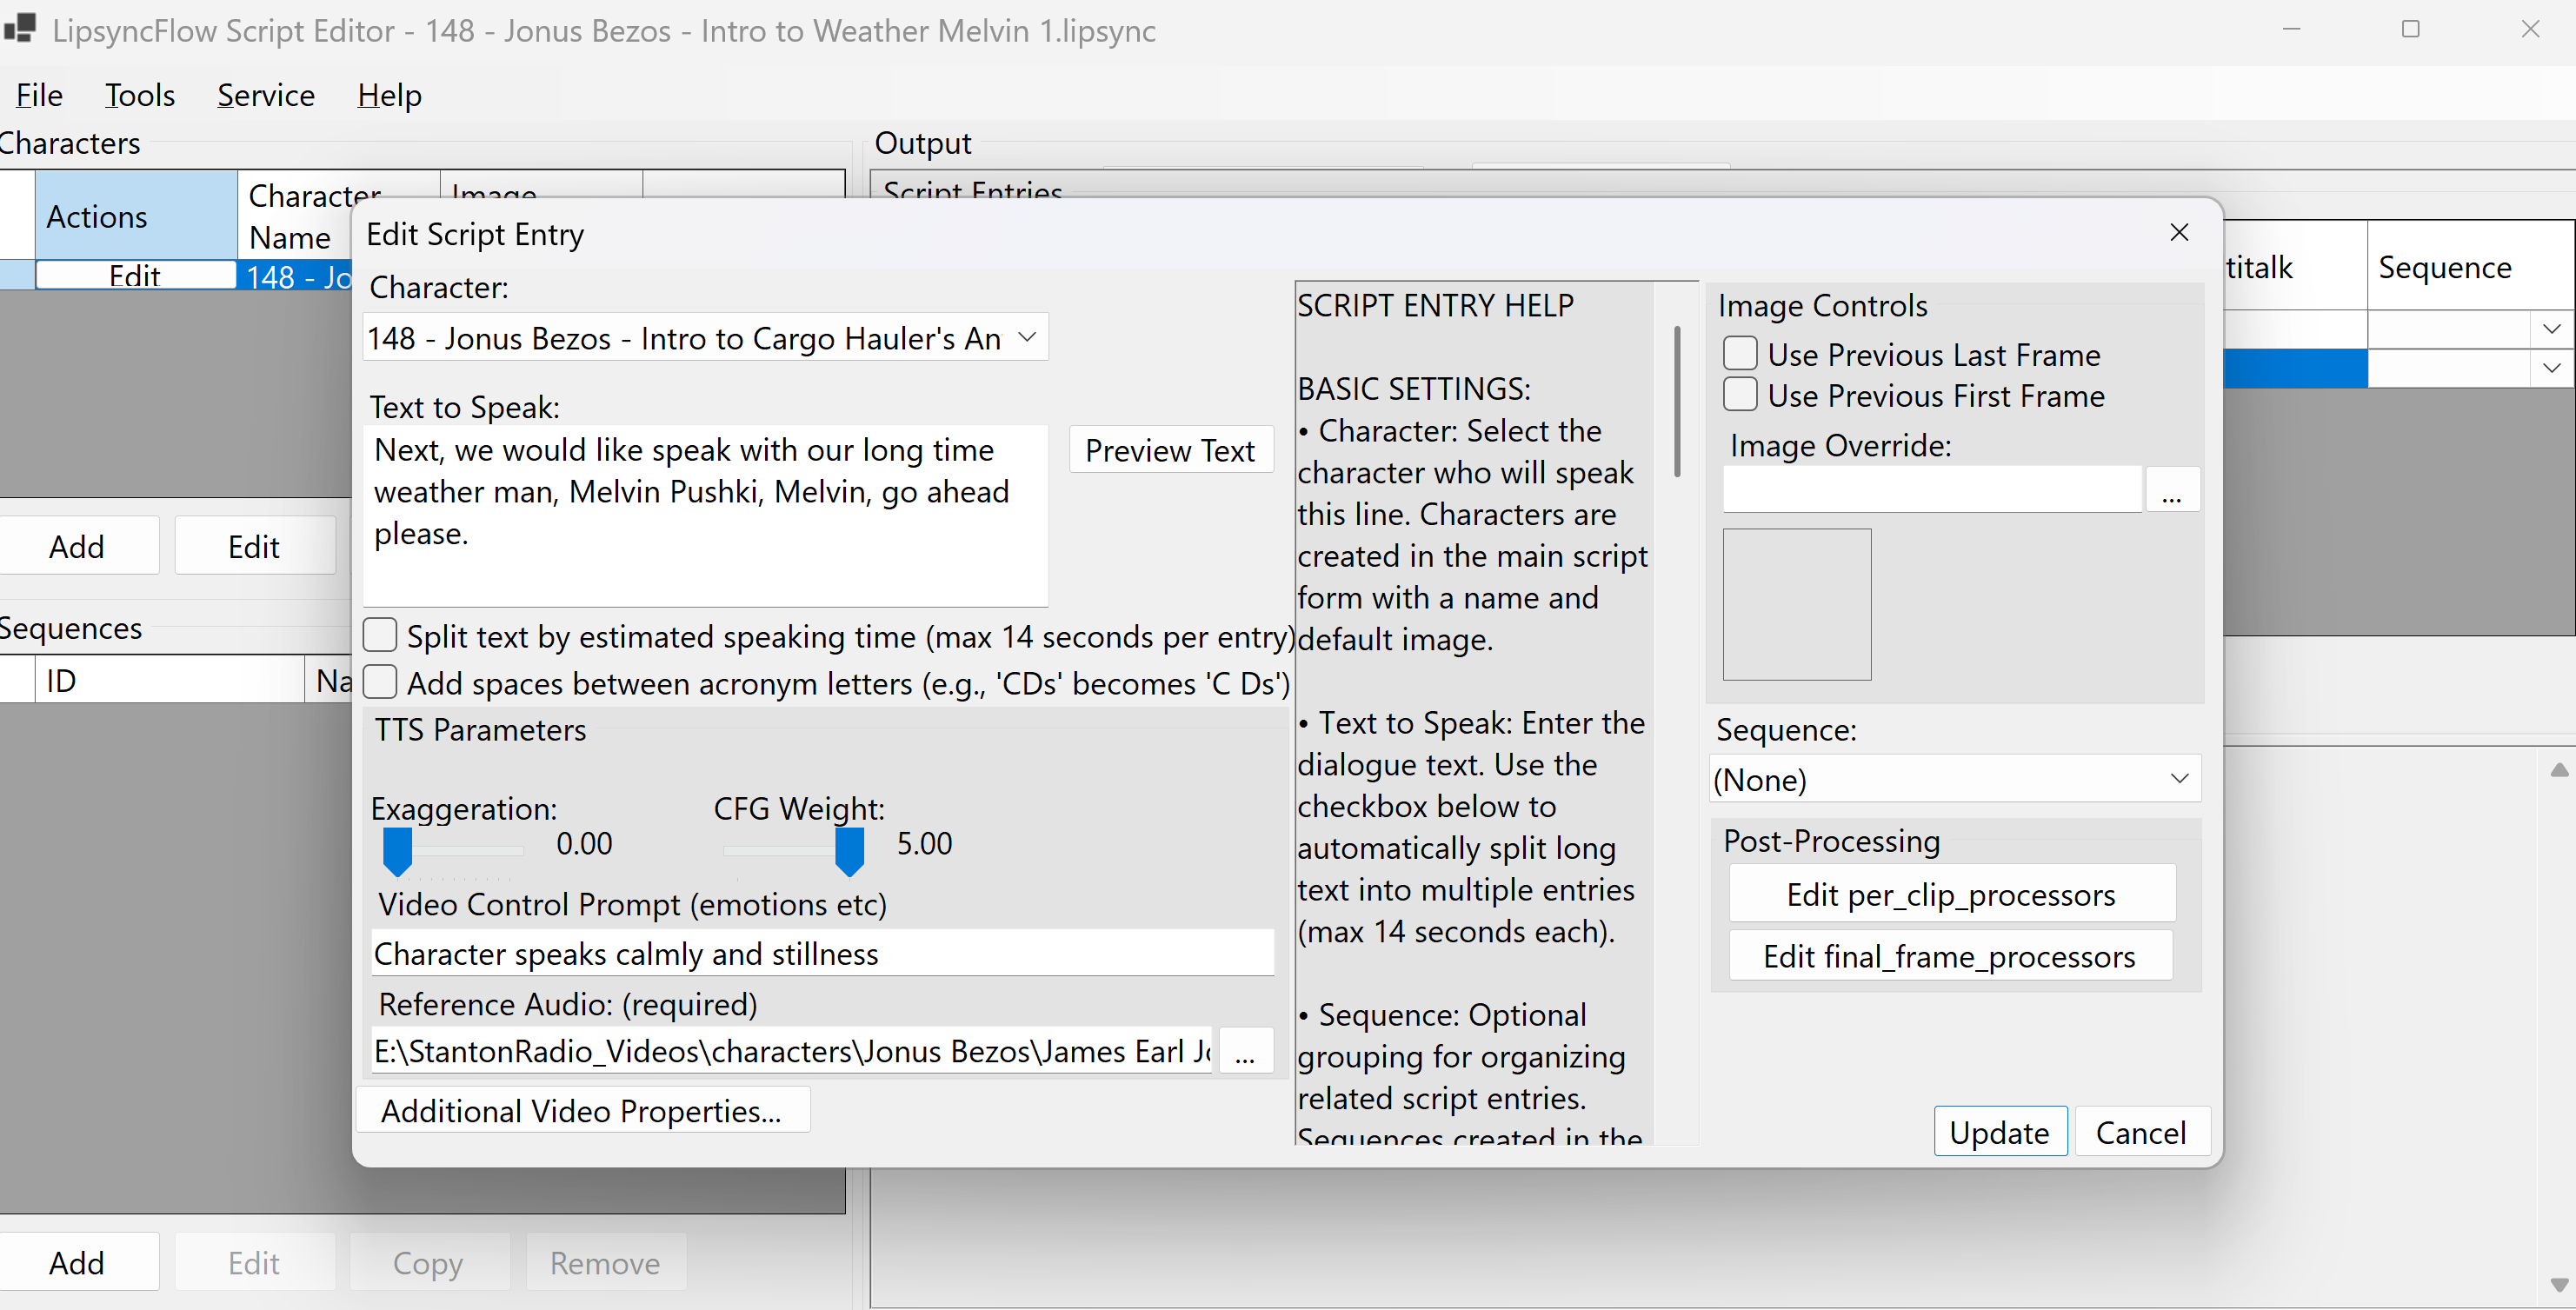
This dialog is where you configure all the details for an individual script entry, which represents a single AI-generated video clip:
- Character: Select the character who will speak this line. The character's default image and voice print audio will be used unless overridden.
- Text to Speak: Enter the dialogue for the character. Remember the 30-second spoken limit per entry.
- Text Splitting Options: Check "Split text by estimated speaking time" to automatically break long text into ~15-second segments, helping to manage video length and quality.
- TTS Parameters: Adjust "Exaggeration" (emotional intensity) and "CFG Weight" (TTS quality/pacing). Provide a "Video Control Prompt" for emotional guidance and ensure the "Reference Audio" (voice print) is correctly linked.
- Image Controls:
- Use Previous Last/First Frame: Start this clip with the last or first frame of the previously rendered video in the job, ensuring visual continuity.
- Image Override: Provide a specific image file to use as the starting image for this clip, overriding the character's default.
- Sequence: Assign this script entry to an existing sequence for grouped processing.
- Post-Processing: Access buttons to "Edit per_clip_processors" (FFmpeg filters applied to this individual clip) and "Edit final_frame_processors" (FFmpeg filters applied to the final frame of this clip).
- Update/Cancel: Save your changes or discard them.
Text Length Requirements
Each script entry's text must be less than 30 seconds when spoken. This ensures optimal video generation quality and processing efficiency.
- Longer videos = more artifacts: As video length increases, visual artifacts become more noticeable
- Rendering time increases exponentially: Each additional second takes progressively longer to render
- Performance baseline: On a 4090 GPU, a 5-second video takes approximately 1.5 minutes per second of video (7.5 minutes total)
- Quality vs. Speed: Shorter videos render faster and with better quality
- Recommended minimum: GPU with 24 GB of VRAM for optimal performance
- Testing specifications: All performance data and recommendations are based on testing with a 4090 GPU on 30-second or less videos at 480×832 resolution
- VRAM scaling: Longer videos and higher resolutions require significantly more VRAM - plan accordingly
- Lower VRAM impact: GPUs with less VRAM may experience slower rendering, memory errors, or quality degradation
- Memory management: Monitor your GPU memory usage and consider reducing video length or resolution if you encounter memory errors
Advanced Text Processing
- Split by Speaking Time: Automatically breaks long text into chunks of approximately 15 seconds based on estimated speaking time (125 words per minute). This helps keep each script entry video short enough to meet the 30-second requirement and reduces rendering time and artifacts.
- Acronym Spacing: Adds spaces between letters in acronyms for better pronunciation (e.g., 'NASA' becomes 'N A S A')
- Preview Split: See how your text will be divided before saving
TTS Parameters
Exaggeration (0.0 - 1.0)
Controls emotional intensity and lip movement expressiveness
- 0.0 = Calm, subtle movements
- 0.5 = Moderate expression
- 1.0 = Very expressive, exaggerated
CFG Weight (0.5 - 5.0)
Influences TTS generation quality and pacing
- 0.5 = Fast generation, natural pacing
- 2.0 = Balanced quality and speed
- 5.0 = High quality, controlled pacing
Reference Audio
Required audio file for voice cloning and TTS generation
Image Source Control
Control how each video starts by choosing from these options (in priority order):
- Image Override: Specific image file for this entry
- Use Previous Last Frame: Last frame from previous video
- Use Previous First Frame: First frame from previous video
- Character Default: Character's default image (fallback)
🎞️ Sequence Management
Sequences allow you to group related script entries and apply FFmpeg filters to individual videos or the combined sequence.
Creating Sequences
Sequence Features
- Per-Clip Processors: FFmpeg filters applied to individual videos before joining
- Joined Video Processors: FFmpeg filters applied to the final combined video
- Script Entry Assignment: Assign script entries to sequences via the dropdown
- Group Processing: All videos in a sequence are processed together
⚙️ Media Processor Library
The Media Processor Library is your toolkit for managing reusable FFmpeg filter chains across all your projects.
Accessing the Library
🎛️ Advanced Video Render Options
The "Additional Video Properties" button in the script entry dialog allows you to modify AI video model settings. These settings directly affect video quality, rendering speed, and success rate.
Core Video Settings
size
What: Video resolution in pixels (height×width)
Why: Higher = sharper but slower/more VRAM
Typical: 480×832, 720×1280, 1280×720, 832×480, 1024×1024
Tip: Start with 480×832 for speed and lower VRAM usage
sample_steps
What: Quality vs speed steps
Why: More steps = better detail, slower render
Typical: 10–20 (testing), 30–40+ (final quality)
Tip: Keep 10 for quick tuning
fps
What: Frames per second
Why: Higher = smoother motion, larger files
Typical: 25 for natural motion and manageable size
Tip: 25 is usually optimal
resolution
What: Human-friendly label for size (e.g., "480p")
Why: Keeps settings organized and clear
Typical: "480p", "720p", "1080p"
Tip: Keep in sync with size setting
Lip-Sync and Guidance Settings
sample_audio_guide_scale
What: Lip-sync strength from audio
Why: Higher = tighter mouth timing; too high may reduce image quality
Typical: 4.0 (baseline), try 5.0–6.0 for stronger sync
Tip: Best first tweak for better lipsync
sample_text_guide_scale
What: How strongly the text prompt steers visuals
Why: Too high can fight lipsync timing
Typical: 1.0–2.0 for lipsync work
Tip: Keep low (1) for lipsync
guidance2_scale
What: Secondary guidance strength
Why: Fine-tunes overall guidance balance
Typical: 5.0 baseline; adjust slightly (4–6) if needed
Tip: Usually leave alone
embedded_guidance_scale
What: Extra internal guidance strength
Why: Higher follows internal cues more strongly
Typical: 6 (leave as is)
Tip: Usually leave alone
Timing and Motion Settings
sample_shift
What: Temporal schedule "shift"
Why: Changes motion timing/consistency slightly
Typical: 4–7. Default 5 is good
Tip: Default 5 works well
flow_shift
What: Additional flow/temporal shift control
Why: Fine-tunes temporal behavior
Typical: 4–7; default 5 matches sample_shift
Tip: Keep equal to sample_shift unless you know you need different behavior
switch_threshold
What: Advanced guidance switch sensitivity
Why: Subtle effect; leave at 0 unless experimenting
Typical: 0; try 100 or 200 for small changes
Tip: Usually leave alone
skip_steps_multiplier
What: Skips a portion of early steps to speed up
Why: Faster but reduces detail
Typical: 0 (off). Try 0.2–0.5 only if you need speed
Tip: Only use if you need faster rendering
Color and Quality Settings
color_correction_strength
What: Global color stabilization strength (single-clip)
Why: Prevents color drift over time
Range: 0.0–1.0
Tip: For short clips, 0 is fine; for color drift, raise toward 1.0
data_type
What: Numeric precision used by the model
Why: Affects quality and compatibility
Typical: BF16 (good default); FP16 if needed for compatibility
Tip: Leave as BF16
attention_mode
What: Attention implementation
Options: auto (standard), sage (alternative)
Typical: auto
Tip: Leave auto
Long Video Settings (Sliding Window)
sliding_window_size
What: Chunk length for long videos
Why: Larger = fewer cuts but more VRAM/time
Typical: 129 (good default)
Tip: Only change for very long videos
sliding_window_overlap
What: Frames shared between chunks
Why: Higher overlap = smoother transitions, more compute
Typical: 5
Tip: Keep default for most cases
sliding_window_overlap_noise
What: Extra noise in overlaps to reduce seams/blur
Why: Prevents visible chunk boundaries
Typical: 20
Tip: Keep default
sliding_window_color_correction_strength
What: Color matching across chunks
Why: Maintains color consistency between video segments
Range: 0.0–1.0. Typical 1.0 for consistency
Tip: Keep 1.0 for long videos
Advanced and Style Settings
base_seed
What: Random seed for repeatability
Why: -1 = new random each run; fixed number = reproducible results
Typical: -1 (random) or fixed number for consistency
Tip: Use a fixed number when you like a result and want to re-render it
sampler_solver
What: Sampling algorithm
Options: unipc (balanced/fast), dpm++ (smooth), euler (different feel)
Typical: unipc
Tip: Start with unipc
Text Prompt and Advanced Settings
prompt
What: Text description that nudges look/feel
Why: Guides the visual style and mood
Typical: Simple, neutral descriptions
Tip: For lipsync, keep it simple and neutral (e.g., "Character speaks calmly")
sliding_window_discard_last_frames
What: Trim tail frames of each chunk to avoid blend artifacts
Why: Prevents artifacts at chunk boundaries
Typical: 0 (keep all). Raise slightly if you see end-of-chunk artifacts
Tip: Only adjust if you see specific artifacts
Quick Recommendations
- sample_audio_guide_scale: 4 → 5 or 6 for tighter lipsync
- sample_steps: 10 → 14–20 for more detail
switch_threshold, attention_mode, data_type, embedded_guidance_scale, sliding_window settings (unless working with very long videos)
Adjust the sliding window settings; otherwise keep defaults. Long videos require special consideration for memory management and quality consistency.
🔧 Service Configuration
Configure the LipsyncFlow service connection and manage job submissions.
Service Setup
Job Submission
- Send Selected: Send only the selected script entries (if any are selected)
- Send All: Send all script entries regardless of selection
- Validation: Scripts are automatically validated before submission
- Job Tracking: Receive job IDs and status updates from the service
🤖 AI-Assisted Script Editing
Use AI to help edit and enhance your LipsyncFlow scripts with the built-in AI prompt builder interface.
Accessing the AI Edit Prompt
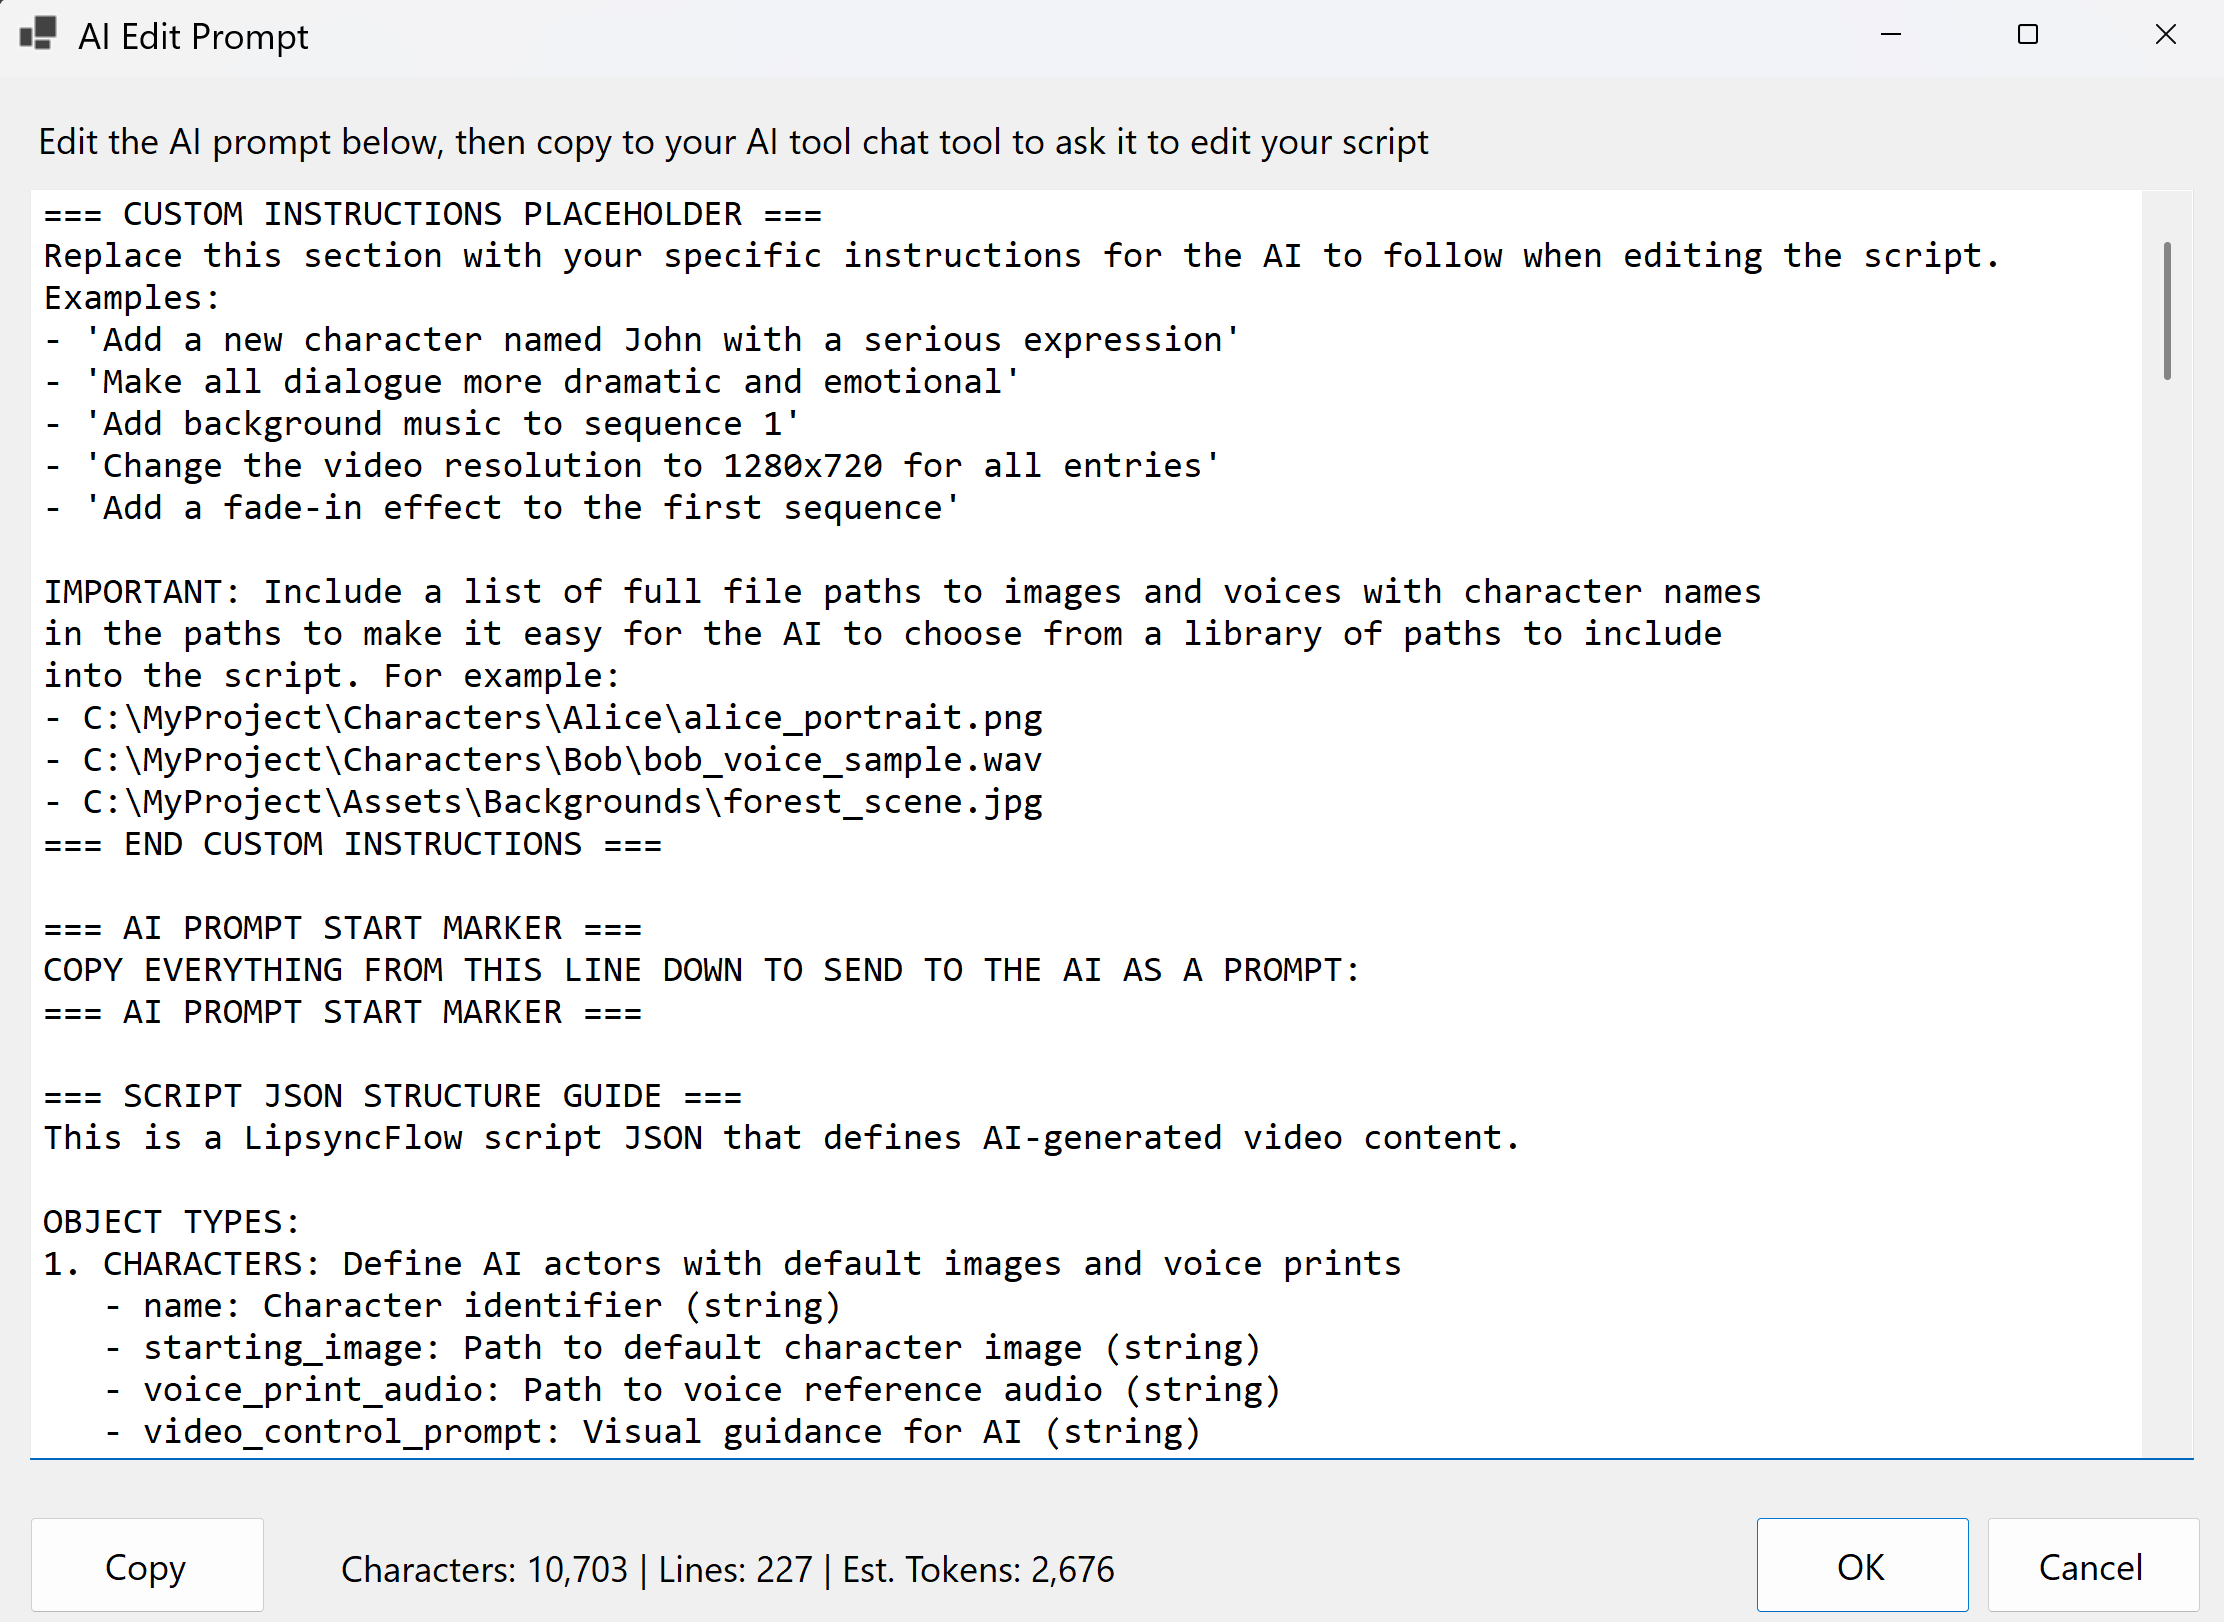
This dialog provides a powerful interface for creating AI prompts to edit your LipsyncFlow scripts:
- Large Text Area: Contains a comprehensive prompt template with your current script data, ready for customization
- Character/Line/Token Counts: Real-time statistics showing the size of your prompt (useful for AI model token limits)
- Copy Button: Instantly copies the current prompt text to your clipboard
- OK Button: Saves any edits you've made and closes the dialog
- Cancel Button: Discards changes and closes the dialog
Understanding the AI Prompt Structure
- Custom Instructions Placeholder: Replace this section with your specific editing requirements
- File Path Guidance: Instructions for including full file paths with character names
- AI Prompt Start Marker: Clear indication of where to start copying for the AI
- Script JSON Structure Guide: Detailed explanation of object types and properties
- FFmpeg Filter Examples: Video and audio filter syntax examples
- Available File Paths: List of all media files referenced in your current script
- Example Script JSON: Your current script's complete JSON representation
- Editing Instructions: Step-by-step guidance for the AI
Complete AI Editing Workflow
Step 1: Generate the AI Prompt
Click "Edit → Copy AI Edit Prompt..." to open the dialog. The prompt will be pre-populated with your current script data and comprehensive editing instructions.
Step 2: Customize Your Instructions
Edit the "CUSTOM INSTRUCTIONS PLACEHOLDER" section with your specific requirements. For example:
=== CUSTOM INSTRUCTIONS PLACEHOLDER ===
Add a new character named "Sarah" with a professional appearance.
Make all dialogue more dramatic and emotional.
Add background music to sequence 1.
Change the video resolution to 1280x720 for all entries.
Include these file paths for the AI to use:
- C:\MyProject\Characters\Sarah\sarah_portrait.png
- C:\MyProject\Characters\Sarah\sarah_voice.wav
- C:\MyProject\Assets\Backgrounds\office_scene.jpg
=== END CUSTOM INSTRUCTIONS ===
Step 3: Copy the Complete Prompt
Click the "Copy" button to copy the entire prompt (including your custom instructions) to your clipboard. The prompt includes everything the AI needs to understand your script structure and requirements.
Step 4: Send to Your AI Chat Interface
Paste the prompt into your preferred AI chat interface (ChatGPT, Claude, Gemini, etc.). The AI will analyze your current script and generate an updated JSON based on your instructions.
Step 5: Copy the AI's Response
Copy the AI's generated JSON response from the chat interface. The AI should return only the modified JSON without any explanations or markdown formatting.
Step 6: Paste Back into LipsyncFlow
Use "Edit → Paste JSON" to import the AI-generated script. Choose whether to replace your current script or merge the changes, and configure conflict resolution options as needed.
- Be Specific: Provide clear, detailed instructions for the changes you want
- Include File Paths: List all available media files so the AI can reference them
- Test Incrementally: Start with small changes and test before making major modifications
- Validate Results: Always use "Tools → Validate Script" after importing AI-generated content
- Backup First: Save your work before making AI-assisted changes
- Review Carefully: Always review AI-generated content before using it in production
- Validate File Paths: Ensure all referenced files exist and are accessible
- Check Character References: Verify that all character names in script entries match existing characters
- Test FFmpeg Filters: Validate any FFmpeg filter syntax before submitting to the service
- Backup Original: Keep a copy of your original script before applying AI changes
Advanced AI Prompt Customization
Character Modifications
Request specific character changes:
Add a new character named "Dr. Smith" with:
- Professional medical appearance
- Calm, authoritative voice
- Use the provided medical office background
- Set exaggeration to 0.3 for professional demeanor
Dialogue Enhancements
Improve existing dialogue:
Make all dialogue more engaging by:
- Adding emotional expressions to video prompts
- Increasing exaggeration to 0.7 for more expressiveness
- Adding pauses and emphasis in longer sentences
- Using more dynamic language
Technical Improvements
Optimize technical settings:
Optimize the script for better quality:
- Set sample_steps to 25 for higher quality
- Increase sample_audio_guide_scale to 5.5 for better lipsync
- Add color correction filters to sequences
- Set consistent video resolution to 720x1280
Troubleshooting AI-Generated Scripts
- Invalid JSON: Ask the AI to return only valid JSON without explanations
- Missing Characters: Ensure all character references exist in the characters section
- File Path Errors: Verify all file paths are correct and files exist
- FFmpeg Syntax: Check that all filter syntax is valid FFmpeg format
- Validation Errors: Use the built-in validation to identify and fix issues
💾 File Operations
Manage your scripts with comprehensive file operations and format support.
Native .lipsync Format
Rich Metadata
Version tracking, creation date, application info, and validation results
Enhanced Data
File existence checks, size information, and duration estimates
Backward Compatibility
Automatic detection of legacy JSON format files
Validation Status
Real-time validation results and detailed error reporting
Import/Export Features
- Script Packages: Export complete scripts with all media files as ZIP archives
- JSON Export: Export to JSON format for external use and compatibility
- Drag & Drop: Load files by dragging them onto the application window
- Recent Files: Quick access to recently opened scripts
- File Info: View detailed information about loaded scripts
🔍 Validation and Debugging
Ensure your scripts are ready for video generation with comprehensive validation tools.
Script Validation
Debug Tools
- Debug Script Data: Log complete script structure to console
- Test JSON Generation: Verify API JSON generation step by step
- Preview API JSON: View the exact payload that will be sent to the service
- Service Connection Test: Verify service accessibility before submission
- Logs Folder: Access detailed logs for troubleshooting
🎯 Best Practices
Follow these guidelines for optimal script creation and video generation:
Character Setup
- Use high-resolution images (at least 512x512 pixels) for best results
- Ensure voice print audio is clear and free of background noise
- Voice print audio should be less than 10 seconds with 1 second of silence at the end
- Test character validation before creating script entries
Script Entry Creation
- Keep individual entries under 30 seconds when spoken for optimal processing and quality
- Use the text splitting feature for longer dialogue to create approximately 15-second segments
- Shorter videos render faster with fewer artifacts - aim for 5-15 second segments when possible
- Preview text splits before saving to ensure proper division
- Set appropriate exaggeration and CFG weight values for your content
Sequence Organization
- Group related script entries into sequences for better organization
- Use descriptive sequence names and IDs
- Apply consistent FFmpeg filters across related videos
File Management
- Save your work frequently using Ctrl+S
- Use the native .lipsync format for full feature support
- Export script packages when sharing projects with others
- Keep backup copies of important scripts
AI-Assisted Editing
- Always backup your script before using AI editing features
- Be specific in your AI instructions and include relevant file paths
- Validate AI-generated content before using it in production
- Test changes incrementally rather than making large modifications at once
- Review and verify all character references and file paths in AI-generated content
🔗 Related Resources
For more detailed information about specific features:
FFmpeg Editing Guide
Learn how to create and manage FFmpeg filter chains for video processing.
Access via Help → Learn how to use me → FFmpeg Editing Guide
FFmpeg Documentation
Official FFmpeg documentation and filter reference.
AI Video Generation
Understanding AI video generation concepts and best practices.
Video Processing Tutorials
Learn advanced video processing techniques and workflows.
GPU Computing
Understanding GPU requirements and optimization for AI workloads.